| 목차 >> Glue Security API 적용 +- library 추가 +- web.xml 수정 +- security-context.xml 추가 +- applicationContext.xml 수정 +- security-service.xml 추가 +- security-query.glue_sql 추가 +- security-servlet.xml 추가 |
Glue Security는 Manager모듈(화면)과 API모듈로 구성되어 있으며, 여기서는 API 모듈을 Glue Framework 기반의 Web Application에 적용하는 방법을 다룹니다.
Glue Security API 에서 제공하는 기능들은 Spring Security 기반에서 개발 되었습니다.
Glue(2014.10.24일 기준)에서 사용하는 Spring 버전은 다음과 같고, 버전 간에 호환 문제가 발생하지 않도록 의존물들을 확인해서 맞는 버전을 사용하시기 바랍니다.
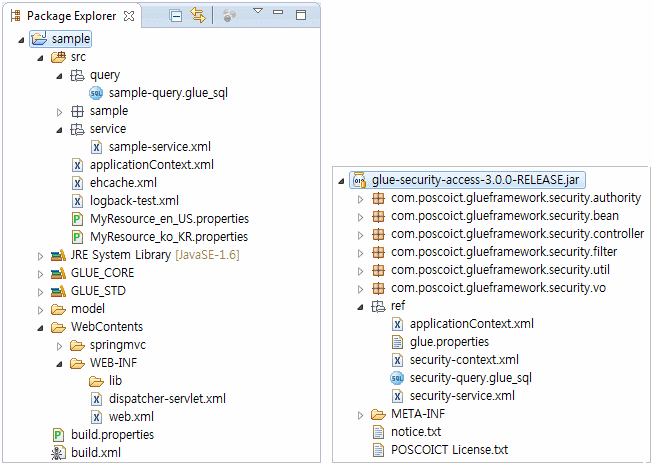
GlueFramework 기반의 Web Application용 Glue Project는 다음과 같은 구조일 것이며, 제공되는 API모듈은 다음과 같이 구성되어 있습니다.
API 모듈은 다음 절차에 따라 적용한다.
API 모듈은 GLUE_CORE에 포함시키며, API모듈의 의존 라이브러리는 GLUE_STD에 포함시킵니다.
제공되는 GlueSDK에 다음 Library를 추가하면 된다.
| library | 설명 | 위치 |
|---|---|---|
| glue-security-access-{version}.jar | API 모듈 | GLUE_CORE |
| jstl-1.2.jar | JavaServer Pages Standard Tag Library | GLUE_STD |
| spring-security-config-3.2.4.RELEASE.jar | Spring Security | GLUE_STD |
| spring-security-core-3.2.4.RELEASE.jar | Spring Security | GLUE_STD |
| spring-security-web-3.2.4.RELEASE.jar | Spring Security | GLUE_STD |
그외 GlueSDK에 포함되어 있는 jackson-core-asl-1.9.12.jar와 jackson-mapper-asl-1.9.12.jar 도 사용되므로, Web Application에서 빠지지 않도록 합니다.
web application의 web.xml 에 다음을 추가한다.
<filter>
    <filter-name>springSecurityFilterChain</filter-name>
    <filter-class>org.springframework.web.filter.DelegatingFilterProxy</filter-class>
</filter>
<filter-mapping>
    <filter-name>springSecurityFilterChain</filter-name>
    <url-pattern>/*</url-pattern>
</filter-mapping>

<context-param>
    <param-name>contextConfigLocation</param-name>
    <param-value>/WEB-INF/security/security-context.xml</param-value>
</context-param>
<listener>
    <listener-class>org.springframework.web.context.ContextLoaderListener</listener-class>
</listener>

<servlet>
    <servlet-name>security</servlet-name>
    <servlet-class>org.springframework.web.servlet.DispatcherServlet</servlet-class>
    <load-on-startup>1</load-on-startup>
</servlet>
<servlet-mapping>
    <servlet-name>security</servlet-name>
    <url-pattern>/SecurityReload</url-pattern>
</servlet-mapping>
web.xml에 <filter>가 있다면 그 순서에 유의해서 추가 하도록 한다.
이미 ContextLoaderListener를 사용하고 있다면, contextConfigLocation 의 <param-value>에 다음과 같이 securty-context.xml 만 추가한다.
<context-param>
    <param-name>contextConfigLocation</param-name>
    <param-value>
        /WEB-INF/some-context.xml
        /WEB-INF/security/security-context.xml
    </param-value>
</context-param>
web.xml 의 dispatcher servlet이 이미 있을 것이고, sercurity servlet을 추가 등록하였으니, url-pattern이중복되지 않도록 유의한다.
web.xml의 <context-param>에 지정된 파일이름을 근거로 security-context.xml 을 추가한다. security-context.xml은 API모듈에 포함되어 있으며, 그 내용은 다음과 같다.
<?xml version="1.0" encoding="UTF-8"?>
<beans:beans xmlns="http://www.springframework.org/schema/security"
 xmlns:beans="http://www.springframework.org/schema/beans"
 xmlns:xsi="http://www.w3.org/2001/XMLSchema-instance"
 xmlns:security="http://www.springframework.org/schema/security"
 xsi:schemaLocation="http://www.springframework.org/schema/beans
               http://www.springframework.org/schema/beans/spring-beans.xsd
               http://www.springframework.org/schema/security
               http://www.springframework.org/schema/security/spring-security.xsd">
    <http auto-config="true" access-denied-page="/denied.jsp">
        <custom-filter ref="filterInvocationInterceptor" after="FILTER_SECURITY_INTERCEPTOR" />
        <custom-filter ref="gluefilter" before="FILTER_SECURITY_INTERCEPTOR" />
        <form-login login-page="/login.jsp" default-target-url="/menu.jsp" />
    </http>
    <beans:bean id="filterInvocationInterceptor" class="org.springframework.security.web.access.intercept.FilterSecurityInterceptor">
        <beans:property name="observeOncePerRequest" value="false" />
        <beans:property name="securityMetadataSource" ref="glueInvocationDefinitionSource" />
        <beans:property name="authenticationManager" ref="authenticationManager" />
        <beans:property name="accessDecisionManager" ref="accessDecisionManager" />
    </beans:bean>

    <beans:bean id="glueInvocationDefinitionSource" class="com.poscoict.glueframework.security.bean.GlueInvocationDefinitionSource"/>
    <beans:bean id="gluefilter" class="com.poscoict.glueframework.security.filter.GlueServiceFilter"/>
    <beans:bean id="accessDecisionManager" class="org.springframework.security.access.vote.AffirmativeBased">
        <beans:property name="allowIfAllAbstainDecisions" value="true" />
        <beans:property name="decisionVoters">
            <beans:list>
                <beans:bean class="org.springframework.security.access.vote.RoleVoter" />
            </beans:list>
        </beans:property>
    </beans:bean>
    <authentication-manager alias="authenticationManager">
        <authentication-provider user-service-ref="glueUserService" >
            <password-encoder hash="sha">
                <salt-source user-property="username"/>
            </password-encoder>
        </authentication-provider>
    </authentication-manager>
    <beans:bean id="glueUserService" class="com.poscoict.glueframework.security.bean.GlueUserDetailsService"/>
</beans:beans>
<http>의 access-denied-page 속성과 <form-login>의 login-page 와 default-target-url 속성은 그 값을 변경해서 사용할 수 있다.
위와 같은 예제에서는 denied.jsp, login.jsp, menu.jsp를 필요로 한다.
다음은 login.jsp예제이다.
<%@ page contentType="text/html;charset=utf-8"%>
<%@ taglib uri="http://java.sun.com/jsp/jstl/core" prefix="c"%>
<!DOCTYPE html>
<html>
<head>
<title>Login Page</title>
</head>
<body>
    <font color="red">${sessionScope["SPRING_SECURITY_LAST_EXCEPTION"].message}</font>
    <br>
    <form action="j_spring_security_check" method="POST">
        아이디 : <input type="text" name="j_username" size="20" value="" /><br>
        비밀번호 : <input type="password" name="j_password" size="20" /><br>
        <input type="submit" value="Login" />
    </form>
</body>
</html>
다음은 denied.jsp 예제이다
<%@ page contentType="text/html;charset=utf-8"%>
<!DOCTYPE html>
<html>
    <head>
        <meta charset="UTF-8">
        <title>Denied Page</title>
    </head>
    <body>
접근 할 수 없는 Page 군요!!!<br>
<a href="<%=request.getContextPath()%>">확인</a><br/>
    </body>
</html>
security-context.xml의 gluefilter 와 glueUserService 빈은 viewAuthorityManager와 serviceAuthorityManager를 필요로 하므로 applicationContext.xml에 viewAuthorityManager와 serviceAuthorityManager를 추가한다.
<bean id="securityDs" class=". . . ">
    . . . 중략 . . .
</bean>
<bean id="securityTx"
      class="com.poscoict.glueframework.transaction.GlueDataSourceTransactionManager">
    <property name="dataSource" ref="securityDs"/>
</bean>
<bean id="securityDao" class="com.poscoict.glueframework.dao.jdbc.GlueJdbcDao">
    <property name="dataSource" ref="securityDs"/>
    <property name="queryManager" ref="queryManager"/>
</bean>

<bean id="viewAuthorityManager"
      class="com.poscoict.glueframework.security.authority.GlueViewAuthorityDbManagerImpl">
    <property name="jdbcDao" ref="securityDao"/>
</bean>
<bean id="serviceAuthorityManager"
      class="com.poscoict.glueframework.security.authority.GlueServiceAuthorityDbManagerImpl">
    <property name="jdbcDao" ref="securityDao"/>
</bean>
securityDs 는 2가지 유형중 한가지를 선택해서 사용하며, 유형에 따라 property 를 설정하도록 한다.
API 모듈에 포함된 security-service.xml을 WebApplication의 service 폴더에 복사한다. 내용을 수정할 필요는 없다.
<?xml version="1.0" encoding="UTF-8"?>
<service name="security-service" initial="Router" xmlns="http://www.poscoict.com/glueframework/service">
    <activity name="Router" class="com.poscoict.glueframework.biz.activity.GlueDefaultRouter">
        <transition name="getUserInfo" value="UserRouter"/>
        <transition name="success" value="getUrlPattern"/>
    </activity>
    <activity name="getUrlPattern" class="com.poscoict.glueframework.biz.activity.GlueJdbcSearch">
        <transition name="success" value="end"/>
        <property name="sql-key" value="security.urlRepository.select"/>
        <property name="dao" value="securityDao"/>
        <property name="param-count" value="0"/>
        <property name="result-key" value="ResourcePattern"/>
    </activity>
    <activity name="getUsers" class="com.poscoict.glueframework.biz.activity.GlueJdbcSearch">
        <transition name="success" value="getRoles"/>
        <property name="sql-key" value="security.userInfo.select"/>
        <property name="result-key" value="users"/>
        <property name="dao" value="securityDao"/>
        <property name="param-count" value="1"/>
        <property name="param0" value="user_id"/>
    </activity>
    <activity name="getRoles" class="com.poscoict.glueframework.biz.activity.GlueJdbcSearch">
        <transition name="success" value="end"/>
        <property name="param0" value="user_id"/>
        <property name="sql-key" value="security.role.select"/>
        <property name="dao" value="securityDao"/>
        <property name="param-count" value="1"/>
        <property name="result-key" value="roles"/>
    </activity>
    <activity name="UserRouter" class="com.poscoict.glueframework.biz.activity.GlueDefaultRouter">
        <transition name="crc_id" value="getCrcUsers"/>
        <transition name="success" value="getUsers"/>
    </activity>
    <activity name="getCrcUsers" class="com.poscoict.glueframework.biz.activity.GlueJdbcSearch">
        <transition name="success" value="getRoles"/>
        <property name="sql-key" value="security.userInfo.select.crc"/>
        <property name="dao" value="securityDao"/>
        <property name="param0" value="crc_id"/>
        <property name="param1" value="user_id"/>
        <property name="param-count" value="2"/>
        <property name="result-key" value="users"/>
    </activity>
</service>
API 모듈에 포함된 security-query.glue_sql을 WebApplication의 query 폴더에 복사한다. 내용을 수정할 필요는 없다.
<?xml version="1.0" encoding="UTF-8"?>
<queryMap desc="sample" xmlns="http://www.poscoict.com/glueframework/query">
    <query id="security.urlRepository.select" desc="" isNamed="false"
           resultType="com.poscoict.glueframework.security.vo.GlueResource">
        <![CDATA[
SELECT R.RESOURCE_PATTERN, RR.ROLE_ID
FROM RESOURCES R, RESOURCES_ROLES RR
WHERE R.RESOURCE_ID=RR.RESOURCE_ID AND R.RESOURCE_TYPE='URL'
        ]]>
    </query>
    <query id="security.userInfo.select" desc="" isNamed="false"
           resultType="com.poscoict.glueframework.security.vo.GlueUser">
        <![CDATA[
SELECT * FROM USERS WHERE USER_ID=?
        ]]>
    </query>
    <query id="security.role.select" desc="" isNamed="false"
           resultType="com.poscoict.glueframework.security.vo.GlueRole">
        <![CDATA[
SELECT ROLE_ID
FROM GROUPS_ROLES
WHERE GROUP_ID IN (SELECT GROUP_ID FROM USERS WHERE USER_ID=?)
        ]]>
    </query>
    <query id="security.viewRoles.select" desc="" isNamed="false"
           resultType="com.poscoict.glueframework.security.vo.GlueViewRoles">
        <![CDATA[
SELECT V.*, VR.ROLE_ID
FROM VIEW_AUTHORITY V, VIEW_ROLES VR
WHERE V.VIEW_ID=VR.VIEW_ID
        ]]>
    </query>
    <query id="security.userInfo.select.crc" desc="" isNamed="false"
           resultType="com.poscoict.glueframework.security.vo.GlueUser">
        <![CDATA[
SELECT * FROM USERS WHERE CRC_ID=? AND USER_ID=?
        ]]>
    </query>
    <query id="security.serviceRoles.select" desc="" isNamed="false"
           resultType="com.poscoict.glueframework.security.vo.GlueResource">
        <![CDATA[
SELECT R.RESOURCE_PATTERN, RR.ROLE_ID
FROM RESOURCES R, RESOURCES_ROLES RR
WHERE R.RESOURCE_ID=RR.RESOURCE_ID AND R.RESOURCE_TYPE='SERVICE'
        ]]>
    </query>
</queryMap>
web.xml 에 다음과 같이 security servlet이 추가되어 있으므로 WEB-INF 밑에 security-servlet.xml 을 추가한다
<servlet>
    <servlet-name>security</servlet-name>
    <servlet-class>org.springframework.web.servlet.DispatcherServlet</servlet-class>
    <load-on-startup>1</load-on-startup>
</servlet>
<servlet-mapping>
    <servlet-name>security</servlet-name>
    <url-pattern>/SecurityReload</url-pattern>
</servlet-mapping>
추가할 security-servlet.xml의 내용은 다음과 같다.
<?xml version="1.0" encoding="UTF-8"?>
<beans xmlns="http://www.springframework.org/schema/beans"
    xmlns:xsi="http://www.w3.org/2001/XMLSchema-instance"
    xmlns:context="http://www.springframework.org/schema/context"
    xmlns:dwr="http://www.directwebremoting.org/schema/spring-dwr"
    xsi:schemaLocation="http://www.springframework.org/schema/beans
        http://www.springframework.org/schema/beans/spring-beans-3.0.xsd
        http://www.springframework.org/schema/context
        http://www.springframework.org/schema/context/spring-context-3.0.xsd
        http://www.springframework.org/schema/mvc
        http://www.springframework.org/schema/mvc/spring-mvc-3.0.xsd
        http://www.directwebremoting.org/schema/spring-dwr
        http://www.directwebremoting.org/schema/spring-dwr-3.0.xsd">
    <bean id="urlMapping" class="org.springframework.web.servlet.handler.SimpleUrlHandlerMapping">
        <property name="mappings">
            <value>
                /SecurityReload=securityController
            </value>
        </property>
    </bean>
    <bean name="securityController" class="com.poscoict.glueframework.security.controller.GlueSecurityResourceReload"/>
    <bean id="viewResolver" name="jsonView" class="org.springframework.web.servlet.view.json.MappingJacksonJsonView"/>
</beans>
