개발자 Guide
목차 >> Spring Security 란
2장 Spring Security 란
Spring Security는 Spring Framework기반으로 구현된 WEB에 Security관련 기능을 제공하며, 다음 두 가지 주제에 대해 관심을 갖고 있습니다.
- Authentication(인증) : 권한을 결정하기 전에 사용자가 이 웹사이트 자체를 이용할 자격이 있는지를 확인하는 작업(로그인 페이지등을 통해서 사용자 인증)
- Authorization(권한) : WEB에서 제공되는 자원(웹페이지, 이미지, 사운드, 동영상 등)을 접근할 자격이 있는지 확인하는 작업
사용자는 먼저 인증 과정을 거쳐서 정상적인 사용자인지를 확인하고 이후에는 사용자가 접근하는 자원에 대해 권한을 가지고 있는지를 확인하는 방식입니다.
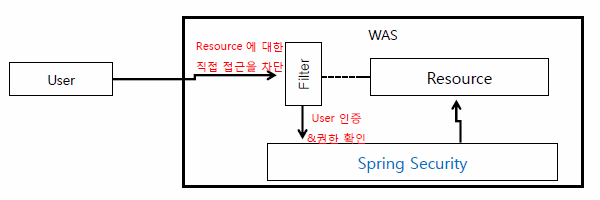
권한과 인증 관련 기능들의 개발은 고려해야할 사항이 매우 많기 때문에 매우 까다롭습니다. 하지만 Spring Security에서는 이러한 기능들을 효율적으로 개발할 수 있도록 지원하고 있습니다.
Spring Security에서 기본으로 제공하는 설정을 그대로 사용하면 단순 xml 파일 작성만으로 Security 기능 구현이 끝나지만 실제 프로젝트에서는 요구 사항이 그렇게 단순하지 않기 때문에 이에 대한 커스터마이징 작업이 필요합니다.
이번장에서는 Spring Security 의 최소한의 내용을 다루며, 자세한 것은 Spring Security Project 사이트를 참고하십시요.
web.xml
Spring Security 기능을 적용하기 위해 web.xml에 <filter>와 <listener>를 등록합니다.
- <filter> :
org.springframework.web.filter.DelegatingFilterProxy - <listener> :
org.springframework.web.context.ContextLoaderListener
filter 추가
web.xml에 다음과 같이 filter를 추가합니다.
<web-app ...>
    ...
    <filter>
        <filter-name>springSecurityFilterChain</filter-name>
        <filter-class>org.springframework.web.filter.DelegatingFilterProxy</filter-class>
    </filter>
    <filter-mapping>
        <filter-name>springSecurityFilterChain</filter-name>
        <url-pattern>/*</url-pattern>
    </filter-mapping>
    ...
</web-app>
web.xml에 DelegatingFilterProxy를 등록할 때 <filter-name>의 값은 반드시 springSecurityFilterChain 이 되도록 합니다.
DelegatingFilterProxy는 스프링 컨텍스트에서 <filter-name>과 동일한 이름의 빈을 찾아 실제 요청을 위임합니다.
<filter-name>이 springSecurityFilterChain이면 Spring Security가 자동으로 생성하는 빈을 사용하므로 직접 빈을 만들어 줄 필요가 없습니다.
listener 추가
web.xml에 다음과 같이 listener를 추가합니다.
<web-app ...>
    ...
    <context-param>
        <param-name>contextConfigLocation</param-name>
        <param-value>/WEB-INF/security/security-context.xml</param-value>
    </context-param>
    <listener>
        <listener-class>org.springframework.web.context.ContextLoaderListener</listener-class>
    </listener>
    ...
</web-app>
contextConfigLocation에는 Security Context 파일(security-context.xml)의 경로를 설정합니다.
ContextLoaderListener는 웹 애플리케이션 시작 시 해당 파일을 읽어 스프링 컨텍스트를 초기화합니다.
security-context.xml
Context 파일은 <beans:beans> 요소로 구성되며, security 라는 네임스페이스(xmlns:security)가 포함되어 있습니다.
Context 파일(security-context.xml)은 다음과 같은 모습입니다.
<?xml version="1.0" encoding="UTF-8"?>
<beans:beans xmlns="http://www.springframework.org/schema/security"
    xmlns:beans="http://www.springframework.org/schema/beans"
    xmlns:xsi="http://www.w3.org/2001/XMLSchema-instance"
    xmlns:security="http://www.springframework.org/schema/security"
    xsi:schemaLocation="http://www.springframework.org/schema/beans
                        http://www.springframework.org/schema/beans/spring-beans.xsd
                        http://www.springframework.org/schema/security
                        http://www.springframework.org/schema/security/spring-security.xsd">
    <http use-authorization-manager="true">
        <intercept-url pattern="/**" access="authenticated"/>
        <csrf/>
    </http>

    <authentication-manager>
        <authentication-provider>
            <user-service>
                <user name="guest" password="{noop}guest" authorities="ROLE_USER"/>
            </user-service>
        </authentication-provider>
    </authentication-manager>
</beans:beans>
Context 파일은 <http>와 <authentication-manager> 으로 구성되며, 이러한 설정만으로 간단하게 Spring Security의 기본 기능 ( 로그인과 각 페이지 권한 관리등 )을 동작하게 할 수 있습니다.
<http> 와 <authentication-manager> 에 대한 자세한 설명은 Spring Security Project 사이트를 참고하십시요.
login-page 커스터마이징
일반적으로 Spring Security에서 제공하는 기본 로그인 창을 이용하는 경우는 거의 없을 것입니다. 이 경우 <form-login> 요소를 이용하면 로그인 페이지를 커스터마이징 할 수 있습니다.
이 때 로그인 URL 인터셉터를 모든 리소스를 차단하는 인터셉터의 위쪽으로 배치시켜야 합니다. 그렇지 않다면 순환 오류로 인하여 정상적인 로그인 창이 뜨지 않습니다.
다음은 <form-login>이 사용된 예입니다.
<http auto-config="true">
    <security:intercept-url .. 중략 .. />
    <form-login login-page="/login.jsp"
                username-parameter="username"
                password-parameter="password"
                login-processing-url="/login"
                default-target-url="/index.jsp"
                authentication-failure-url="/login.jsp?error"/>
</http>
<form-login>의 주요 속성은 다음과 같습니다.
login-page: 로그인 페이지 URLusername-parameter: 아이디 파라미터명password-parameter: 비밀번호 파라미터명login-processing-url: 로그인 폼 전송 URLdefault-target-url: 로그인 성공 후 이동 URLauthentication-failure-url: 로그인 실패 시 이동 URL
login 인증 커스터마이징
로그인 인증시 DB를 사용하기 위해서는 <authentication-provider>의 <user-service> 대신에 <jdbc-user-service> 를 이용할 수 있습니다.
다음은 <user-service>를 사용한 예입니다.
<http .../>
<authentication-manager>
    <authentication-provider>
        <user-service>
            <user name="guest" password="{noop}guest" authorities="ROLE_USER"/>
        </user-service>
    </authentication-provider>
</authentication-manager>
다음은 <jdbc-user-service>를 사용한 예입니다.
<jdbc-user-service> 에는 users-by-username-query, authorities-by-username-query 외의 다른 속성은 Spring Security Project 사이트를 참고하십시요.
<http .../>
<authentication-manager>
    <authentication-provider>
        <jdbc-user-service data-source-ref="datasource"
            users-by-username-query="select user_id,password,enabled
                                     from users
                                     where user_id=?"
            authorities-by-username-query="select u.user_id,gr.role_id
                                           from users u, groups_roles gr
                                           where u.user_id=?
                                             and u.group_id=gr.group_id" />
    </authentication-provider>
</authentication-manager>
그외에도 <authentication-provider>의 user-service-ref 속성을 이용할 수 있습니다. 다음은 user-service-ref 속성을 사용한 예입니다.
<http .../>
<authentication-manager>
    <authentication-provider user-service-ref="customUserService"/>
</authentication-manager>
<beans:bean id="customUserService"
            class="com.example.security.CustomUserDetailsService"/>
customUserService는 org.springframework.security.core.userdetails.UserDetailsService를 상속받아 다음과 같이 구현할 수 있습니다.
import org.springframework.security.core.authority.SimpleGrantedAuthority;
import org.springframework.security.core.userdetails.User;
import org.springframework.security.core.userdetails.UserDetails;
import org.springframework.security.core.userdetails.UserDetailsService;
import org.springframework.security.core.userdetails.UsernameNotFoundException;
import org.springframework.jdbc.core.JdbcTemplate;

import java.util.List;
import java.util.stream.Collectors;

public class CustomUserDetailsService implements UserDetailsService {

    private final JdbcTemplate jdbcTemplate;

    public CustomUserDetailsService(JdbcTemplate jdbcTemplate) {
        this.jdbcTemplate = jdbcTemplate;
    }

    @Override
    public UserDetails loadUserByUsername(String username) throws UsernameNotFoundException {
        try {
            return jdbcTemplate.queryForObject(
                    "SELECT user_id, password, enabled FROM users WHERE user_id = ?",
                    new String[]{username},
                    (rs, rowNum) -> {
                        String userId   = rs.getString(1);
                        String password = rs.getString(2);
                        boolean enabled = rs.getBoolean(3);

                        List<SimpleGrantedAuthority> authorities = jdbcTemplate.queryForList(
                                        "SELECT role_id FROM user_roles WHERE user_id = ?",
                                        String.class, userId
                                ).stream()
                                .map(SimpleGrantedAuthority::new)
                                .collect(Collectors.toList());

                        return User.builder()
                                .username(userId)
                                .password(password)
                                .disabled(!enabled)
                                .authorities(authorities)
                                .build();
                    });
        } catch (org.springframework.dao.EmptyResultDataAccessException e) {
            throw new UsernameNotFoundException("User not found: " + username);
        }
    }
}
Password 암호화
Spring Security에서 기본적으로 제공하는 PasswordEncoder 구현 클래스는 다음과 같습니다.
org.springframework.security.crypto.bcrypt.BCryptPasswordEncoder(기본 권장)org.springframework.security.crypto.argon2.Argon2PasswordEncoderorg.springframework.security.crypto.password.Pbkdf2PasswordEncoderorg.springframework.security.crypto.scrypt.SCryptPasswordEncoder
Spring Security에서는 {bcrypt}, {SHA-1}, {sha256} 등 prefix 기반으로 여러 인코더를 지원하는 DelegatingPasswordEncoder 사용을 권장합니다.
PasswordEncoderFactories.createDelegatingPasswordEncoder()를 사용하면 다양한 인코딩 포맷을 하나의 인코더로 처리할 수 있습니다.
<http .../>
<authentication-manager>
    <authentication-provider user-service-ref="customUserService">
        <password-encoder ref="passwordEncoder"/>
    </authentication-provider>
</authentication-manager>

<!-- DelegatingPasswordEncoder: bcrypt를 기본 인코더로 사용 -->
<beans:bean id="passwordEncoder"
            class="org.springframework.security.crypto.factory.PasswordEncoderFactories"
            factory-method="createDelegatingPasswordEncoder"/>
Spring Security Concurrency
Spring Security에서 생성한 Security 관련 정보는 SecurityContext에 담겨 있습니다.
SecurityContext는 SecurityContextHolder라는 유틸 클래스를 통해서 접근할 수 있습니다.
SecurityContext는 Thread 단위로 저장되므로 새로운 Thread에서 작업이 일어날 경우 SecurityContext 정보를 잃어버릴 수 있습니다.
Spring Security에서는 Multi Thread 환경에서도 SecurityContext 정보를 유지할 수 있도록 다음과 같은 추상화를 제공합니다.
-
DelegatingSecurityContextRunnable : Runnable 객체를 이용해서 새로운 Thread에서도 SecurityContext를 유지하는 기능을 다음과 같이 구현할 수 있습니다.
Runnable originalRunnable = () -> { // ... 작업 수행 }; SecurityContext context = SecurityContextHolder.getContext(); DelegatingSecurityContextRunnable wrappedRunnable = new DelegatingSecurityContextRunnable(originalRunnable, context); new Thread(wrappedRunnable).start(); -
DelegatingSecurityContextExecutor : DelegatingSecurityContextRunnable보다 복잡하지만 Spring Security를 사용하고 있다는 사실을 어느 정도 숨겨줄 수 있습니다.
Runnable originalRunnable = () -> {
    // ... 작업 수행
};
SecurityContext context = SecurityContextHolder.createEmptyContext();
Authentication authentication =
    new UsernamePasswordAuthenticationToken("userTest", null);
context.setAuthentication(authentication);

SimpleAsyncTaskExecutor delegateExecutor = new SimpleAsyncTaskExecutor();
DelegatingSecurityContextExecutor executor =
new DelegatingSecurityContextExecutor(delegateExecutor, context);
executor.execute(originalRunnable);
보안 관련 주요 기능
인증 정보 접근
인증 정보에 접근할 때는 SecurityContextHolder를 사용하는 것을 권장합니다.
Authentication auth = SecurityContextHolder.getContext().getAuthentication();
String username = auth.getName();
Object principal = auth.getPrincipal();
Session 관리
-
Session Time Out 처리
Spring Security에서는 유효하지 않은 세션 ID를 감지하고 적절한 URL로 리다이렉트 시키도록 설정할 수 있습니다.
이것은 session-management 엘리먼트를 사용합니다.
security-context.xml 에 session-management를 다음과 같이 추가할 수 있습니다.<http use-authorization-manager="true"> ... <session-management invalid-session-url="/login.jsp?expired"/> </http> -
동시 Session 제어
User가 동시에 한번만 로그인할 수 있도록 처리하고 싶으면, Spring Security는 다음과 같이 간단한 설정으로 해당 기능을 추가할 수 있도록 지원합니다. Session 생명주기와 관련된 이벤트를 Spring Security가 받을 수 있도록 하기 위해, 우선 다음의 리스너를 web.xml 파일에 추가할 필요가 있습니다.
<listener>
    <listener-class>
        org.springframework.security.web.session.HttpSessionEventPublisher
    </listener-class>
</listener>
그리고 context(security-context.xml)에 다음의 코드를 추가합니다.
<http>
    ...중략...
    <session-management>
        <concurrency-control max-sessions="1" />
    </session-management>
</http>
이것은 한 User가 동시에 두번 로그인 하는것을 방지합니다. (두번째 로그인으로 인해 첫번째 로그인은 무효화됩니다)
만약 두번째 로그인을 방지하고 첫번째 로그인을 유지하고 싶다면, 다음과 같이 설정하면 됩니다.<http> ...중략... <session-management> <concurrency-control max-sessions="1" error-if-maximum-exceeded="true" /> </session-management> </http>이외에도 session-management설정을 통해서 악의적인 접근을 차단하는 다양한 설정들이 가능합니다.
자세한 내용은 Spring Security관련 사이트를 참고하십시요.
크로스 사이트 요청 변조(CSRF) 방어
크로스 사이트 요청 위조 (CSRF)는 웹사이트 취약점 공격의 하나로, 사용자가 자신의 의지와는 무관하게 공격자가 의도한 행위(수정, 삭제, 등록 등)를 특정 웹사이트에 요청하게 하는 공격을 말합니다.
사이트간 요청 위조는 특정 웹사이트가 사용자의 웹 브라우저를 신용하는 상태를 노린 것입니다. 즉, 일단 사용자가 웹사이트에 로그인한 상태에서 사이트간 요청 위조 공격 코드가 삽입된 페이지를 열면 이후에는 사용자의 행동과 관계 없이 사용자의 웹 브라우저와 공격 대상 웹사이트 간의 상호작용이 이루어집니다.
-
CSRF 방어 방법
CSRF 공격을 차단하는 원천적인 방법은 FORM 데이터가 전송될 때 해당 전송이 정상적인 전송인지 여부를 검사하는 것입니다. 스크립트에 의한 FORM 데이터 전송은 비정상적인 전송이고 정상적인 사용자가 브라우징해서 전송하는 것은 정상적인 전송입니다. 이를 구분하기 위해 CSRF 토큰이라는 개념을 사용합니다. FORM 이 구성될 때 임의의 값으로 토큰을 생성해 폼 히든 값에 저장하며, FORM 데이터가 전송을 처리하는 서버 페이지에서 FORM 에서 전송된 히든 값이 올바른 값인지 여부를 비교합니다. 스크립트에서 변조된 요청은 히든 값을 올바르게 만들어 낼 수 없으므로 CSRF 토큰 검증에 실패하게 됩니다.
이러한 방식으로 CSRF 공격을 안전하게 차단할 수 있습니다. 단, CSRF 토큰이 예측 불가능한 임의의 토큰이 되어야 합니다. CSRF 토큰 값이 예측된다면 공격 스크립트는 예측된 값으로 CSRF 토큰 자체도 변조할 수 있기 때문입니다. -
CSRF 방어를 위한 Spring Security 설정
Spring Security에서는 CSRF 토큰 값을 생성하고 유효성을 체크하는 기능을 기본으로 제공하고 있는데 이 기능을 비활성화 하기 위해서는 <http>내에 <csrf> 요소를 추가해 주면 됩니다.
<http>
    <!-- ... -->
    <csrf disabled="true"/>
</http>
CSRF Protection기능이 활성화 될 경우 GET방식 이외의 요청에 대해서 CSRF 토큰 값이 유효한지 체크하게 됩니다.
CSRF 유효성 체크를 통과하기 위해서는 Form 데이터에 hidden값으로 CSRF 토큰 값이 존재해야 합니다.<form name="form1" method="post" action="sample.mvc"> ... <input type="hidden" name="${_csrf.parameterName}" value="${_csrf.token}"/> </form>Security 태그를 사용하면 아래와 같은 태그로 hidden값 설정을 대체할 수 있습니다.
<%@ taglib prefix="sec" uri="http://www.springframework.org/security/tags" %>
...
<form name="form1" method="post" action="sample.mvc">
    ...
    <sec:csrfInput />
</form>
Form 태그를 사용하면 자동으로 csrf token 을 생성하여 hidden값으로 설정해 줍니다.
<%@ taglib prefix="form" uri="http://www.springframework.org/tags/form" %>
...
<form:form name="form1" method="post" action="sample.mvc">
   ...
</form:form>
CSRF 토큰 값은 세션에 저장되기 때문에 세션 만료 시간을 초과한 사용자는 접근이 거부되는 등의 문제가 발생할 수 있으므로 사용에 주의해야 합니다.
보안 Header 추가
Spring Security에서는 보안 강화를 위해서 Response에 보안관련 header를 추가 할 수 있습니다.
보안 header 추가는 관련 이슈에 대해 기본적인 방어 기능만 제공하므로 완벽하게 방어되지는 않습니다. 또한 브라우저마다 다르게 동작할 수 있으므로 유의해야 합니다.
예를들어 xss-protection header를 추가할 경우 XSS공격을 방지하기 위해서 크롬 필터에서는 포스트 방식의 파라미터까지 체크를 하지만, 익스플로러 8이상(이전버전에서는 해당 기능 없음)에서는 필터에서 Get방식의 파라미터만을 체크합니다.
Spring Security에서는 context.xml에 아래와 같이 설정하여 보안 header를 추가 할 수 있으며 <headers/>태그만 사용하여도 아래 보안 header들이 모두 추가 됩니다.
<http>
    ...
    <headers>
        <cache-control />
        <content-type-options />
        <hsts />
        <frame-options />
        <xss-protection />
    </headers>
</http>
-
cache-control
브라우저 캐시 설정에 따라서 다른 사용자가 인증 후 방문한 페이지를 로그 아웃한 후 캐시 된 페이지를 악의적인 사용자가 볼 수 있는 문제가 발생 할 수 있습니다.
이러한 문제를 완화하기 위해서 Spring Security 설정에 <cache-control/> 태그를 추가 할 수 있는데 이 태그가 추가되면 Response header에 아래 내용이 추가됩니다.Cache-Control: no-cache, no-store, max-age=0, must-revalidate Pragma: no-cache Expires: 0
-
content-type-options
브라우저에서 Content sniffing 을 사용하여 request content type 을 추측 할 수 있는데 이것은 XSS 공격에 악용 될 수도 있습니다.
Spring Security 설정에 <content-type-options/>태그가 추가되면 Response header에 아래 내용이 추가되어 Content sniffing이 비활성화 됩니다.X-Content-Type-Options: nosniff
-
hsts
많은 사용자들이 웹 사이트에 접근할 때 https를 생략하고 입력하는데 이것은 Man-in-the-middle 공격의 원인이 될 수도 있습니다. 이것을 방지하기 위해서 HTTP Strict Transport Security (HSTS)가 만들어 졌습니다. mybank.example.com가 HSTS 호스트로 추가되면 mybank.example.com에 대한 요청이 https://mybank.example.com으로 해석됩니다.
HSTS 관련해서 Spring Security 설정에 <hsts/>태그를 추가하면 아래와 같은 Response header가 추가됩니다.Strict-Transport-Security: max-age=31536000 ; includeSubDomains
-
frame-options
어떤 웹사이트에 frame을 추가 할 수 있도록 하는 것은 보안에 문제가 될 수 있습니다. 예를들어, 사용자가 의도하지 않은 기능을 클릭하도록 속일 수 있는데 이러한 공격을 Clickjacking이라고 합니다.
Clickjacking 공격을 완화하기 X-Frame-Options을 사용하는데 Spring Security 설정에 <frame-options/>태그를 추가하면 Response header에 아래 내용이 추가됩니다.X-Frame-Options: DENY
-
xss-protection
일반적으로 브라우저에는 XSS공격을 방어하기 위한 필터링 기능이 내장되어 있습니다. 이 기능으로 XSS공격을 완벽하게 방어하지는 못하지만 XSS 공격의 보호에 많은 도움이 됩니다.
Spring Security 설정에 <xss-protection/>태그를 추가하면 아래와 같은 Response header가 추가되어 브라우저에서 XSS 필터링 기능이 활성화 됩니다.X-XSS-Protection: 1; mode=block
| Prev | Home | Next |